01 July 2023

Shaker Nightstand with Inlay

 In 1st quarter of 2023, I took the Wood Working 2 class for the Mount Diablo Adult Education school.  The prior quarter I had taken WW1 from them.  The piece we were assigned to make was this shaker nighstand.  The were several reasons I took the class:  more exposure to woodworking machines (I have very few at home), completion of this class opens up access to all the other woodworking classes, I like the instructor, I like taking a class one night a week (breaks things up).


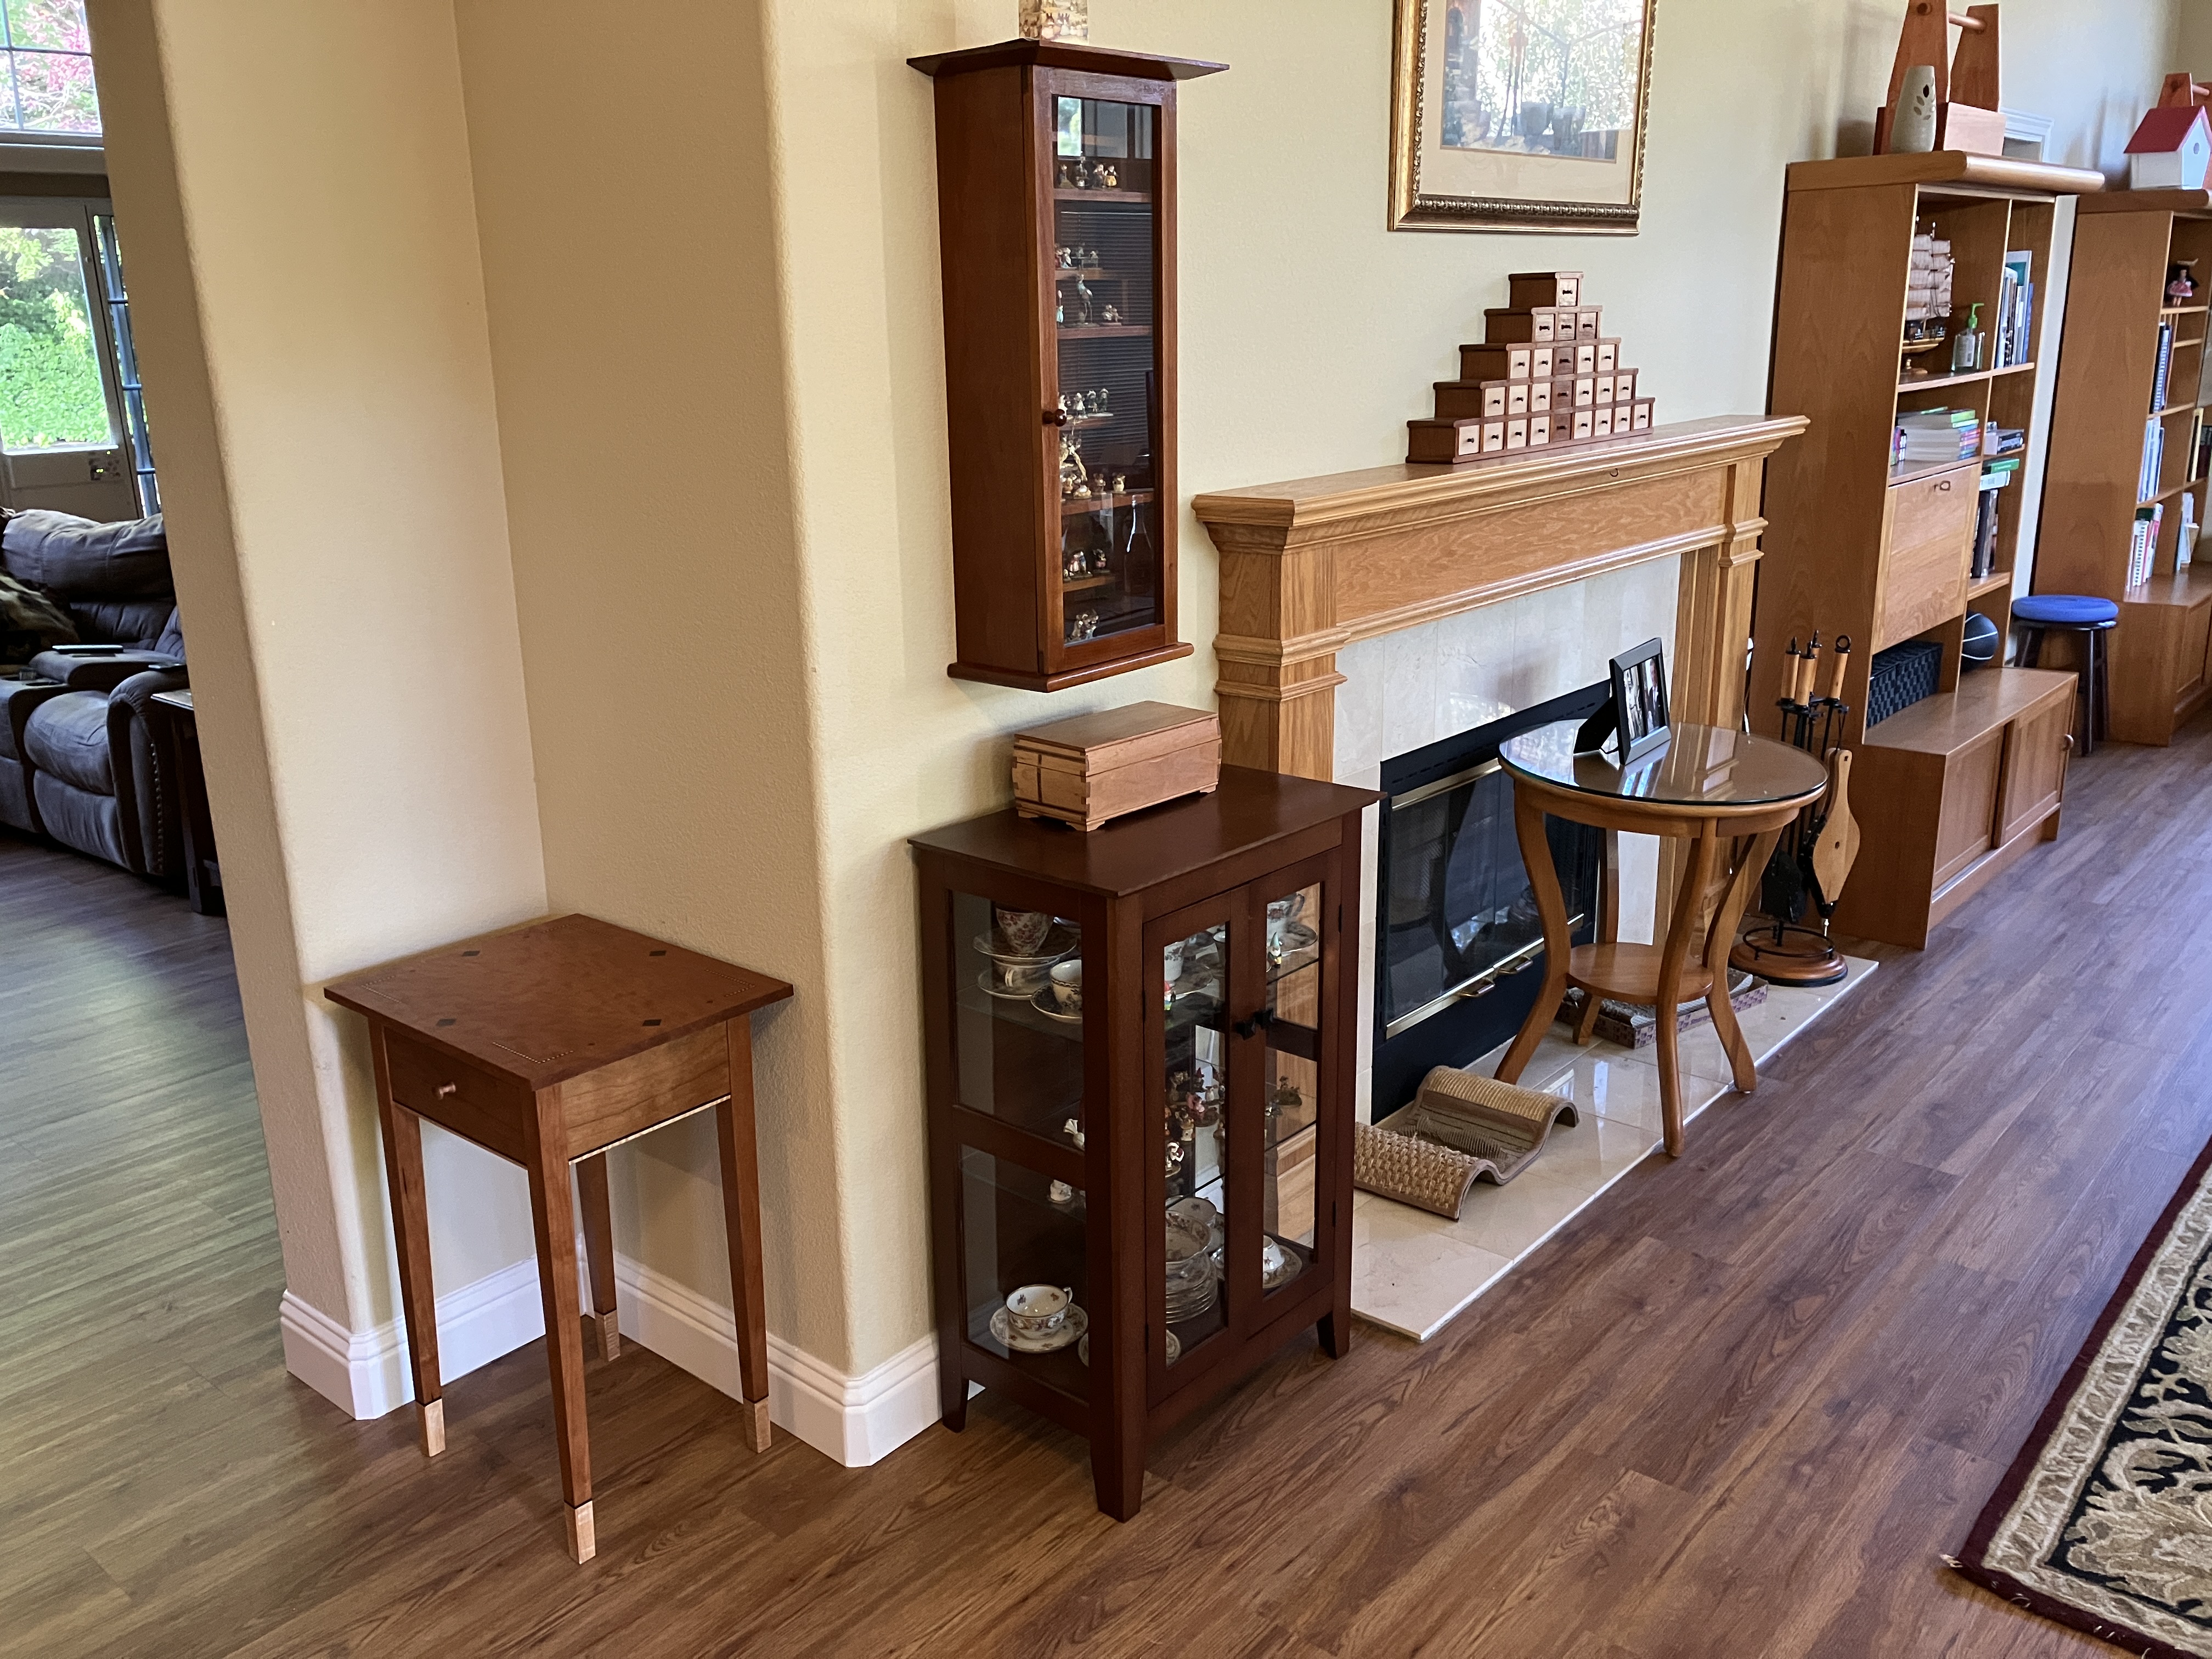
There were a few things at the outset that I decided to do differently:  

I was going to be selective in terms of what machines I would and wouldn't use.  For example, I just don't like routers and jointers, as such I wasn't going to use them and I would find other ways to get things done.  In my mind, this would be a bit closer to how I wanted to woodwork at home.

I was going to be nice wood.  It was going to be chery as that's my favorite.  The top was going to be nicely figured cherry (quilted cherry).  The sides would be plain cherry.  The legs would be rift sawn.  Since I knew what the project for this class was well in advance, I ordered the wood October so that it would have 3 months to equilibrate/dry.

I was going to see how quickly I could get it done.  I wanted the table but I wasn't going to be extra fussy over it.  I wanted just the simple wood to speak for itself.

How did I do?  Points 1 & 2 I stuck to.  Point 3 fell by the wayside.  I was making good progress on the piece and would have likely finished it up half way through the class.  Then, I saw two things that inspired me enough to do a change in plans.  On instagram, MeridithHeartFurniture showed some images with really nice inlay on the top of her piece (Meredith Hart (@meredithhartfurniture) | Instagram).  I wanted to do something similar.  Within a week of that, Tom MuLaughlin of Epic Woodworking did a video on putting cuffs on furniture (https://www.youtube.com/live/FUKjJFK177w?feature=share).  I liked that as well and wanted to do that.  Now, if I had planned to do these from the onset, I would have done it differently.  As such, it was a bit more difficult to do.  Overall, this was fun work that required great focus.  I probably spent 40 to 50 hours on the overall build without taking into account the inlay.  I think I spent 100+ hours to do all this inlay (150 hours total). 

I am happy with the way it came out.  The top is a bit more formal that I would normally build for myslef but overall I like it.  What I also discovered is that I really like Tried and True Linseed oil finish.  It's the second or third time I've used it.  I like the look it has with cherry.  For almost all of the pieces I've made over the last 7ish years, I've used shellac and have really liked the look of shellac.  I will likely finish more of my pieces with the Tried and True oil.  It's not an either or situation.  

The construction itself was straight forward.  I resawed the top to mirror the grain in the curly cherry.  The riftsawn legs came from on 8 quarter piece.  I had a few sides where it wasn't perfectly riftsawn so those were faced inside and in the back.


For the dovetails, I had the space between the tails at 1/8".  I like it and this is the narrowest gap I've used to date.  I think I want to make some future drawers with a 1/16" gap between dovetails to see how that looks.  For the back of the drawer, I did a more fancy (in my mind) connection.  I used a dado that that had through wedged tenons.  It came out nice as well. 


The top was connected with turn buttons.  


The inlay was all done by hand and most of it was from 1/8" thick ebony and figured maple.  I bought the inlay banding and forget it's components.  I also learned that if the edges of the inlay are black, it helps to hide any gaps.  I also like the drawer, sides, and back of the piece also have inlay.  It doesn't jump out but is a nice touch that gets noticed on a third look over.  


The finish as I mentioned was Tried and True partially polymerized linseed oil.  I did four coats of their varnish (0000 steel wool between each) and then two coats of their partially polymerized linseed oil with beeswax.  I followed the instructions to the letter with one exception - I wait a full week between coats.  In between coats, I took it outside to sunbathe and to darken the cherry.  It made a noticeable difference.  I figure a longer wait can't hurt, except it tries my patience.  All in all, I'm very happy with how it turned out.  Little by little my house is getting filled with furniture nicer than I could afford to purchase.


One final note.  I don't dislike a table saw but I don't think it's all the necessary for the way I wood work.  I have a 15" bandsaw and I can do a lot of things with it (once I finally get it set up - just got electrical upgraded in garage and will purchase dust collector soon).  In terms of cross cutting, it goes by really quick by hand.  This past weekend, I had a bunch of 12 to 14 foot boards I needed to cut to 8 foot lengths (they were 12" wide and 4 quarter thick).  I scribed around the board a 1/8" wide set of lines and sawed between them for this rough cut.  After a few, I decided to time it.  It took all of 2 minutes per board to cross cut.  If I were doing hundreds of boards, sure I would want somethign mechanized but for the half dozen to 10 boards I had to cut, by hand was adequate.  Again, I don't have anyting against anyone woodworking the way they want to.  I am trying to keep to a minimum set of machines and the bandsaw, planer, and mortiser are all I fell like I really need to work the wood.  To each their own.


01 May 2023

Woodworking but Not Blogging

 Lately I just haven't felt like blogging.  Not sure why.  I find I tend to blog in fits and starts.  Sometimes I get up to 10 blogs written and lined up for weekly posting.  Lately, not so much.  I'm hoping to break this streak but writing something, anything.


I am close to finishing up two projects.  One is a "classic" Shaker nightstand table.  It's out of cherry, with ebony and figured maple accents.  For the top, I purchased a really nice piece of quilted cherry.  Just added my last coat of Tried and True finish this past weekend.  Should be able to put the top on next weekend.  I like to go a full week between coats, which is much longer than the instructions but I'm not in a rush.  Took about 150 hours; of this, likely 100 hours were spent on all the inlay on top, feet, and bottom of rails.  Happy with the way it came out.  Will write a blog series on this.  Considering to enter this into the local country fair.  Have a friend who enters his bee's wax and honey and I like county fairs so this could be fun as long as it doesn't get stolen.


The other project is I am making a sub-woofer speaker box for my nephew.  He likes audio equipment and bought a Chevy Suburban to house this (he gave me the dimensions for build).  It is made from Baltic birch, finished with garnet shellac.  Challenges for this project was the size and sheer number of dovetails.  I even included a hounds tooth.  Dovetails are about 1/16" proud to add some dimensionality to it.  Not just a matter of cutting out the top and bottom.  I have about 100 hours into it.  Chopping out dovetails in plywood was "fun."  Learned a lot that will be helpful when I eventually build large bookcases and a China cabinet.  I will blog about it. 


Next batter up is to clean up the workbench that my grandfather made for my cousin in the 1960s.  It doesn't contain lead paint as I checked for that.  Super excited to have this.  Will use to keep my sharpening stones on it and my daughter can use it woodwork on when ever she wants.  Just need to clean with some Krud cutter.  I also have some child chairs, a side table and a storage cabinet.  All of which will find use somewhere either as functional furniture or, in the case of the chairs, decorations on the house.


Next project is to finally get the bandsaw I purchased off of the pallet and the electrician in to add some additional lines/plugs in the garage.  I bought it sooner than I wanted/needed it as I hadn't seen PowerMatic's go on sale for two years.  When this went on sale for 10% off on a Black Friday sale I bought it.  Debating between an Oneida or Harvey or ClearVue dust collector. Have the money saved up.  Waiting for a good deal.  Again, likely don't need this set up and running till 1Q24 so not in a huge rush.


With those all out of the way, I can finally get to the project I had really wanted to so in January of this year which is to make Christian Becksvoort's 15 drawer chest.  It's on my bucket list and wood has been in my shop for two or three years at this point.  I will get good at dovetails by the time this project is done.  Hopefully I will write more frequently soon.

10 March 2023

Satisfaction Trumps Speed

 As a hobby woodworker, I am fortunate that I don't need to worry about my woodworking putting food on the table.  I don't need to justify purchasing a tool.  If I want it, have saved up for it, I can buy it.  Lately, I have been working on a build for a timeless classic Shaker nightstand table (not sure if that is the proper name).  It's part of a woodworking class I am taking one night a week at a local adult education center (Mount Diablo Adult Education in the San Francisco Bay Area).  I've always wanted to build one of these tables and I bought some really nice cherry for the build.

The class I am taking is the second in a series and has an emphasis on machines.  This is part of why I took the class.  I have very limited experience and machines at my home shop and I want to learn how to use them.  All was going well on the build in terms of speed.  Then, on Instagram (@meredithhartfurniture) and on YouTube Tom MuLaughlin of Epic Woodworking (https://www.youtube.com/live/FUKjJFK177w?feature=share) have information that gave me inspiration for this nightstand.  I was going to put "inlay" on the piece.  I had some nice figured maple offcuts form a prior project and some ebony I keep at hand for accents.  It probably will end up taking about 150 hours to build this piece.  Of which, 100 hours are the various inlay bits.  That's ok.  It's a hobby and I am very much enjoying all of this fiddly work.  It's coming out pretty good.  I should be done by the end of March and I started in January.  


Part of me wishes I would have done more in the first quarter of 2023 but that is over ridden by the fact that I will have a very nice piece of furniture in my home.  It's really hard to describe at how much pleasure and satisfaction I'm getting out it.  Also, given all the figure involved in the wood, I've been sharpening a lot and even that has been enjoyable.  I've really come to like the feedback I get on the waterstones.  For seven years prior I had used diamond stones and when they wore out I went to waterstones.  Both work well but they feel a bit different.  Life is good.


04 March 2023

How I "Learned" to Come Up with My Own Designs

 I've been woodworking since 2015.  When I first started, I was perplexed at how to come up with a design.  Rather recently, I've been thinking about a piece I'd like to make next year.  (Why not this year?  I already have the wood for the next three projects and it will likely take me all of this year to get them done.  Could I reprioritize?  Sure but I hate changing plans and pushing stuff off. It's a personality thing)  At some point, I realized I was designing something.  It's not my first (I have two others I will talk about in a bit).  On this third piece, it was coming naturally and I wasn't even conscious I had "learned" how to design.  I thought it might be worth documenting how I got here.  Twenty years from now, my daughter may get a kick out of reading this blog (unlikely but you never know).

I think the first step was just learning how to do basic joinery and wood work with the tools that I own.  Though I could probably write a whole blog on basic joinery, I think a dovetail, mortise and tenon, housing dado/rebate/groove are likely the three main joints.  I am sure I am leaving something out but I wonder if other joints fit into these categories.  For example, a box joint is a kind of dove tail with no slope.  A frame and pannel is a long skinny rebate (or whatever it is called when it runs with the grain).  By knowing basic joints, I understood how things can be assembled.  

By learning the tools (a never ending task), one starts to understand how things are done to get things flat and square, curved, smooth, glue, etc.

Then, I think the next thing was just finding things I wanted to make and making them.  Some projects were appropriate for my skill level and some were a definite stretch.  That's ok.  It's wood and I'm not doing surgery, the downside is minimal.  The more I make, from plans, the more I saw.  Focusing on what I liked helped me understand what "style" I may want to focus on initially.  For me, it was Shaker and Arts and Crafts.


After a number of pieces, I then have a feeling for what thickness common things were.  The first thing I designed was a Advent "calendar" for Christmas.  My wife and I one early Jan Sunday were sitting the church hall having a pancake breakfast and chatting about the nice family Christmas we had.  My wife mentioned how she would really like to have an Advent calendar for our daughter.  We chatted and on the back of a church bulletin, I drew something out.  The final version was refined some but not much.  It needed to have 25 cubbies and I wanted it to reflect both the secular and non-secular nature of the holiday.  The stacking type arrangement gave a tree like shape and wood choices resulted in a cross like image in the piece.  Design was shaker because that it was I knew and liked.  We're happy with it and my daughter has enjoyed using it the past three years.  It came together fairly easily in terms of design.  If I had to make it again, I would keep the overall design the same (we still really like it).  There are some orders of operations and construction things I would do differently but that is true for just about anyting after making one.  I typically will write a lesson's learned in my woodworking notebook at the end of each project.  I keep a notebook so that if I want to go back to redo something or see how I did it, I have a written record.  That comes out of my experience of working as a chemist in the lab and keeping a notebook.


The next design was a bread box for the kitchen.  We used to eat a lot of bread.  The amt of bread we wanted on hand set the dimensions.  I like a mission/craftsman style nightstand I had built so I just took some design inspirations from that and modified it to fit the purpose of a bread box.  The big lessons learned on this was 1. thickness matters and at 3/4" stock it was too clunky and it I had to do it over again I would make it 1/2" thick stock  2.  Using spare/scrap wood isn't always the best idea.  The cherry was fine but I hate hate hate the front pannel of maple as it plain.  I should have bought some figured maple for this.  Live and learn.


Over time, I've bought a lot of used woodworking books to I have lots of images to look at.  Also, I am starting to feel inspired by things I just see.  For example, I was watching Season 3 of the Mandalorian last night.  I really like the see through part of his visor and think that would make for a nice inspiration in a piece of furniture.  I find that I see inspiration lately in all kinds of things.  I take photos and dump into a folder for future reference.

As such, I think once you get a bit comfortable making and knowing how to make, ideas just start popping into your head.  I've at times had two ideas for certain things.  I have since realized that some folks simply have a number of iterations to use all the ideas that pop into their head.  As such, choosing one idea/path doesn't preclude you from eventually using the other.  Laura Mays spoke a few months back at our woodworking club and you could see in her boxes how various ideas were performed shown over time.

I guess what I'm saying to those who are starting.  Don't worry, ideas will come.  Just go about making things you like and some day you will look up and realize that you have been designing for a while and didn't realize it.  Curious if you have had similar or different experiences.