In the last post on 10Sep2022, I outlined how I got up to the design. In this post, I will talk about making the box itself. Spoiler alert, I didn't finish the box at the class (but got quite far) and ended up finishing it at home (which was fine).
With the design established, we milled up wood. Walnut for the box and vertical grain Douglas fir (VGDF) for top and bottom. Since I don't have machine tools (yet, I'm saving for some) at home, it was mostly Laura milling and explaining to me what/how she was doing it. I very much like how safety conscious she is around the machine tools. As a chemist, I've worked around and done many hazardous things going so far as to earn the nickname Captain Caution. What really impressed me was that Laura was able to go from rough sawn wood to S4S'd wood for the small box in 15 minutes. I know from having done it by hand that this would have taken me the better part of a weekend (working 3 to 4 hours each day pace) to get the same thing done. I can really see how having the ability to dimension wood with machine tools makes sense. I've been saving for about a year and a half for a bandsaw, planer/jointer combo, and dust collection. From there, I will evaluate what else I may or may not want. Mostly want those tools to do the donkey work that I now do by hand that I'd prefer not to do.
Before we made the actual piece, Laura wanted us to make a practice side. This allows confirmation of dovetails, grooves, etc. I did it and all come out fine. One of the perks to having a life size drawing is that it was super easy to lay out the dovetails. I didn't actually measure. Rather, I used my dividers from the drawing measuring up from the bottom. The side looked nice and it was onto the actual box. This practice side wouldn't go to waste; I planned to use it plus some spare walnut and VGDF to make a second box.
For the actual box, the dovetail layout was even easier. I just used the practice side. I was starting to feel some pressure in that it was late Wed or early Thur before I started on the actual box and the class ended on Friday. My goal was to get the dovetails cut in the class at minimum and a stretch goal was to get the grooves run for the bottom and top. Since I don't have a machine router at home, running stopped grooves by hand takes longer since I can't use my plough plane on two of the four sides. If I end up not getting to the routed step at class, I will likely use the plough plane at home and then fill the gaps with ebony and make it a feature.
I took my time cutting tails first and really spent time make sure I was square. Time spent here would make things easier. I used a fret saw to remove the bulk of the waste and then used the block on the baseline and then chiseled down. It worked very nicely. This will likely be my go to way to make dovetails moving forward. To transfer for where to cut the pins, I used my marking knife and the alignment jig which I borrowed. It's a handy little jig and I will make one when I get home.
With the transfer knife lines in place, I then used a trick from Paul Sellers, I used my chisel to remove some of the end grain and provide a knife wall for the saw. That way, the key angle across the end grain would be accurate. Cutting and waste removal went well and I got a very nice snug dovetails. The best I think I have every made. Not trying to have too much hyperbole in this but they were really nice dovetails and my wife later remarked she could see a difference in them from this class compared to what I have done in the past. My past dovetails were decent but it was obvious the class has elevated my skill and bit and this makes me happy. Undoubtedly the more I make, the better they will get.
There was just enough time in the class to use the 1/8" router bit to cut the stopped and through grooves. I did the practice piece first. Glad I did. Since I had never used a machine router before, I screwed up the first stopped housing and it became a cut through housing. I have never used a machine router before and misunderstood where to start and stop. Part of why I did the practice piece first. The actual pieces went fine. The weight of the world was off my shoulders at this point. This was about as far as I got.
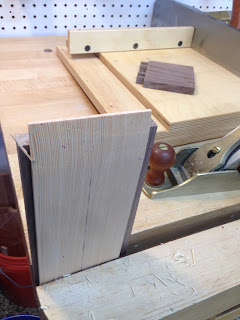
When I got back home, I continued working on the box. Having unfinished projects really bothers me. It's a Myers Briggs personality type thing. I like finishing projects. For the top and bottom, I am using VGDF which I think is a really handsome wood. The big challenge for this is that it is 1/8" thick and I want to put a bevel on both the top and bottom. I call a bevel but really it makes it look more like facets on a gem stone. It took me a while to visualize how to do this. I finally realized that it really is the same as making a raised panel except all four intersections are right next to each other. The bottom one has this gemming underneath and you will only see it if you flip the piece over. I really like having hidden beauty/features on things. There is a good chance as I develop my own woodworking style hidden features will be something I do. Many of my projects already have it.
So, I started with the bottom to make this gem/bevel feature with a freshly sharpened plane blade. It came out ok but I learned a lot in doing it and thought I could do it a second way for the top. The real challenge is how thin the wood is. The second method provided a better looking gem on top. If I had to do it a third time, I would likely use another technique in which I use double sided tape underneath the VGDF so there is more rigidity and clamping options.
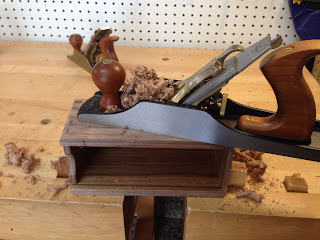
I made the cork backed cauls and then glued up the piece. It went well and after I let it dry, I flushed the dovetails. The next step was the one I was most anxious about. I wanted the box to have angular sides. I was inspired by some of the boxes Laura Mays has made and I wanted to get out of my comfort zone on this. I was careful on the layout. Still, hogging off wood on an already nice looking box had me anxious. I was careful to avoid spelching (an awesome work; probably my second most favorite woodworking term after arris). It came out nice.
With this done, it was time to move onto finishing. One of the finishes Laura Mays likes is made by Liberon so I bought some from Tools for Working Wood and followed the instructions for this oil finish. I put on three or four coats, then some clear shellac (I pre-finished the inside before assembly) and waxed the outside of the box and the grooves for the top.
Finished! All in all, it took about 20-25 hours to make this box. I'm happy with it. It now resides in my kitchen and holds packets of sweetener and sits next to the box I made to hold tea bags. I have enough left over spare wood plus the practice corner to make almost another two boxes so I will do so. I want to spend a lot of time over the next six months working on small dovetail boxes to further develop the skill I learned in the class.
All in all, very happy right now. Every morning when I open the lid and hear that wood on wood slide, it puts a smile on my face. Thank you Laura to teaching me.


hi Joe
ReplyDeletePractice will certainly light the road to the elusive perfection ideal.
I will be stealing two details from you for my next practice box. The dovetail layout - really like the asymmetrical look - and the lid you made. I know I can scrounge up some scraps to whack a box or two like yours.
Cool. I mostly stole the design from Laura Mays as well. She does awesome woodworking and design. Looking forward to your progress.
Delete