Now with the main carcass glued up, I wanted to get the rear panel made. It's the largest one I have done to date. For the actual mortises, I decided to use my table top mortiser. Still don't feel confident in making mortises. At some point in 2022 I am going to dedicate time to practicing skills and dovetails and mortises will be top on the list. The tenons were done by hand and I got the desired level of fit on most of them. Update: On 29Dec2021 while working on another project I did in fact do some mortises by hand. They came out nicely and I got a nice self supporting friction fit for the tenons. I am very happy about this. As such, moving forward I plan to make mortises by hand. I will reserve the table top mortiser on future projects for where there a lot to do and don't want to do as many by hand. Either way, life is good as I am now confident I can make them by hand. Now if I can only get my dovetails to look a bit better (2022 will have my practice a dovetail a day for 30 days as Chris Schwartz has written about as a good way to get better).

One of the fun moments was my daughter helping me. With the long pieces and multiple grooves, I had asked my daughter if she could hold the ShopVac to help collect the chips from the mortising. When she saw me pulling the handle, she really wanted to do that. I let her. It can be hit or miss on my daughters interest in what I'm doing. I'm always happy when she wants to participate. Her attention span is often 15 min max and when I have it, I like to have her participate. With the mortise and tenons done, I used my plough plane to cut the 1/4" wide grooves. It went well. I am starting to feel confident in manipulating the plough plane so it doesn't rock sideways in the groove.


Now it was time to move onto the panels. The plan had been to use 3/8" cherry and I had wide enough stock in the initial order premade. It came to me flat. Unfortunately, it developed a cup in it. I found that I could clamp out the cup. As such, I put the appropriate grooves in the panel so it would fit in 1/4" wide grooves in the rails and stiles and tested each one to make sure it would fit. Each did fit. During the dry assembly, I found that I couldn't clamp out the cut in all three at once. I was frustrated by this. I needed to make a decision. Try and fix the cup or get different material. I decided I would simply get different material. I went with some sort of high end plywood (think it was baltic) for the back panel. That way there would be hidden color contrast when you open it up. I knew the front would have the same issue. For the front I ordered 1/4 thick cherry skimmed plywood (and later discovered it had an MDF core) but we are getting ahead of ourselves so back to the back panel.


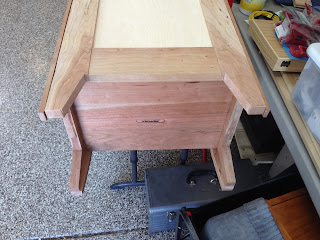
I did a dry clamp up of the back. It worked well. There was some bow in the long stiles (as best I can tell there was internal tension in the board when I sawed it to final width and it bowed) but it could be clamped out. During the glue up, I ended up with an issue and rather remain calm and cool, I got stressed and "used a bigger hammer" to try and fix the problem when it wasn't coming together. Big mistake. I head a sickening crack sound. I got a long fracture on one side of the stile. It was due to me being an idiot and forcing things that shouldn't have been forced. Rather I should have kept calm and problem solved. I know for certain I could have fixed this problem without the wood fracturing. This is a big lesson that will hopefully stick with me moving forward.


A little clean up, cutting up the angles for the lets, and some final fitting and the back was done. This was a big component to the project. Still a fair bit to do but I am happy so for. Next, I move onto the front and put on the face frame. Hopefully, I will keep my lesson of forcing things bad will stick. Stay tuned to see.


No comments:
Post a Comment