30 May 2022

Bad Ugly Failure on A Project - Sigh

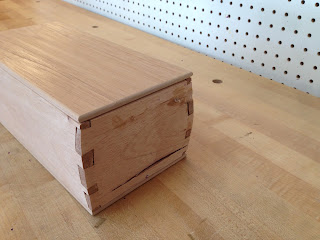
 Ralph of the Accidental Woodworker blog and I are both making Paul Seller's Keepsake boxes.  At first glance, this just seems like a simple dove tail box.  There is a lot of subtle design features to this with curved sides and angled dovetail bases.  I've wanted to build it for a while and finally feel as if I have skills and sensitivity to make it.  The level of subtle complexity became apparent soon into the build (thanks Paul) and I realized I that this first version was going to be a "prototype" rather than the final version.  Too much for me to learn to do it well the first time through.  No problem.


For this version, I wanted it use Spanish cedar because I have never worked with the wood.  It is delightful wood and has a beautiful unique fragrance.  It is on the soft and brittle side of things and I figured this out fairly quickly when working with it.  Part of why I like to try different woods from time to time is just to learn by doing on how these woods perform.  

As such, I was very careful when working on this piece and I knew I would need to be very delicate on the glue up.  I did as much of a mock glue up as possible.  Even made cauls to get decent clamping pressure.  Used Titebond liquid hide glue to give me as much open tie as possible.  Despite all this, I ended up with three fractures in the wood.  It is a horrible feeling.  I tried really hard to be delicate.  In this case, I lost.  After I cut open the box, I will make some adjustments and glue it together.  


The next one will be made out of a harder wood.  The Spanish cedar (at my skill level) was a poor choice I think.  In my gut, I thought I might be able to pull it off.  In this case, I flew too close to the sun and my wings melted.  I am not happy about this.  I probably have over 40 hours invested in the project.  However, no one died, I will have something I can keep pens, etc on my desk, AND I will be making another one out of more suitable wood.  Leaning towards cherry (a wood I am very comfortable working with).  I bought a piece of nice genuine mahogany but not sure I want to try another new wood on this project.

By the way, it's kind of nice making something at the same time someone else is doing it.  There are all kinds of little battles and mini-victories in woodworking.  Nice to be able to share it with someone.  This summer I am taking my first woodworking class ever.  Looking forward to see what that experience is like.

28 May 2022

Krenov Wall Hanging Cabinet Part 1 of 6

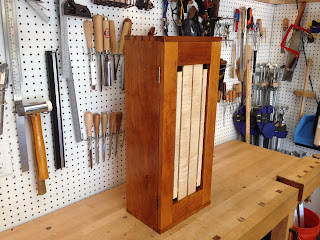
 I have been looking for a while for a wall hanging cabinet to put in our bathroom for additional storage.  I just hadn't found a design I wanted to make.  Then, I received the Feb 2022 (issue #263) and on page 50 I saw it (project # 2202).  It was a Krenov cabinet I had seen before.  I am a huge fan of Krenov's work so I was excited.  Not only would I have a wall cabinet; it was a Krenov design.  The approximate dimensions matched well with our home needs and I had enough scrap cherry to make it from that had some nice figure.  For the front, I decided I would buy some nice figured maple.  I really like the look of cherry and maple.


As for the construction itself, dove tails, housing dados and grooves for the back.  I planned to attach it to the wall by a French cleat.  For finish, I would keep it simple and use shellac (garnet for the cherry and blond for the maple) that I would make from flakes.  

As for the specific dimensions, I didn't follow the plans exactly.  I used the intended contents as well as available wood at home.  It was maybe six inches shorter than the plan and an inch wider.  Again, that was fine as I had a specific purpose in mind.  


Preparing the cherry stock was straight forward and uneventuful.  I did have a few areas of reversing grain that was prone to tear out despite having sharpened the plane blades.  I have a "secret weapon" to help with that, it is a 4-1/2 hand plane that has a 55 degree frog in it.  For most of the tear out, that high angled plane helped.  For the little few spots where I still had tear out, I used a card scraper.  The other thing I did that I was pleased with myself was I measured the thickness with my digital calipers and then used the hand plane to get the wood to a uniform thickness (note: I only have the before photos; didn't think to take the after photos).  With hand tools, that is a bit more work and over each project I find that I am getting more demanding of the exactness of tolerances (where it matters).


In terms of laying out the dovetails, I wasn't concerned with duplicating the magazine version of the Krenov.  I did want the pins to be somewhat narrow.  What I really liked was how the top and bottom boards of the cabinet (where the pins will go) are wider than the sides.  This made the layout a bit more tricky.  Having said that, I like adding something new/more challenging to each build I do so I was looking forward to this.  

In terms of dovetails, I also wanted to really and try and make them even better than the past.  My dovetails are not bad.  I just want them better.  As such, I really slowed down.  I found a couple of tricks I had seen from Paul Sellers  and Kevin Drake to be helpful.  

Helpful thing No 1.  I cut a thin <1/16" rebate on the back of tail boards prior to making the tails.  This helps in the positive registration of the two boards when transferring the tails onto the pin boards.  Also, this slight rebate will hide any gaps on the inside of the dovetails should you go past your mark when cutting out the pins later.  I've seen Paul Sellers do this and that's where I learned it from.


Helpful thing No 2  After marking out the perpendicular to the wood locations for the tails, I used either a knife and then chisel to make a knife wall before starting the cut.  Again, I learned this from Paul Sellers.  Alternatively, I used a Glen Drake scraper to create a groove this is the same width as my saw kerf.  What it does/certainly did for me is to help ensure you get a perpendicular cut across the tail.  The exact angle down isn't critical but a square as cut across as possible is.  So far, the best way I have found to accomplish this.


For removing the tail waste, I have tried a lot of different methods just to see what I think of them beyond what others have to say.  I prefer to use a chisel to remove the waste.  I don't like as much the method of where you first remove the bulk of the waste with a coping saw then chisel out the little bit as you halve your way to the scribe line.  It's not like a huge Ford vs. Chevy pickup truck debate.  Also, if I were taking a class and they wanted us to do a different method, I would do the different method.  I just think I get the cleanest cuts chiseling out the waste.  If you prefer a different way, I will still be your friend as it were.


For transferring the pins onto the tail board, I used a knife then I created knife walls.  I chiseled out (without a coping saw) pin waste.  The gaps were less than prior ones.  However, they were a bit too snug and eventually in the build a got a crack to form on one of the pin boards.  I glued up the crack but it reopened later on during final assembly.  I have historically been having a problem with cracking the boards from my pins and tails being too tight.  I have a potential solution to try on my next build using an offset technique I learned from Kevin Drake at a woodworking show that should solve this.  Kevin Drake has videos on YouTube you can look up.  Basically, in hardwoods the tails are six thousands (ish) bigger than pins and he uses shim offsets to accomplish this.


Well, the blog is getting long.  Despite the crack, I am happy with how the pins and tails came out.  I am also happy with the size of my tails.  In the past I have felt my tails were a bit wide looking.  Functionally they were fine but I wanted a slightly more refined (in my eye) look.


21 May 2022

A cool used book I found and my budding woodworking library

 I like to look for used books.  Recently I was in a book store and found this book called Houses of the Founding Fathers that was published in 2007 by Artisan.  It was only $10!  I was excited.  What I like about it was that it showed very nice homes from 200+ years ago.  In these homes these is lots of nice period furniture.  


I don't have any immediate use for this book BUT as I am deciding on what pieces of furniture, I can use this book for potential inspiration.  I'd like to think that many of these pieces in those homes will be exemplar.   It is also a cool thought of if I find something I like, it leads to a potential conversation with my family that this pieces is a "replicate" of a piece that George Washington, Thomas Jefferson, etc had in their home.  

About six months ago I had posted a question on the Fine Woodworking forum on what books I could get that had good examples of period furniture in them.  I didn't receive much feedback.  Such is life.  This book is certainly one source.  Another excellent source (best I've found to date) is the Society of American Period Furniture Makers (SAPFM.org).  Firstly, I didn't know such a society existed.  It is way cool.  If you are a member, you get the annual magazine that comes out.  Many of the articles go along the lines of I though X was cool and I wanted to make it.  In Y's book, there are many examples of such work ....  As such, I simply copy the title and author of the books mentioned from these articles and past them into Amazon and lo and behold, there are often inexpensive used copies of these books.  Amazing books can be had for not much.  

Little by little I have been building up a nice library of period furniture photos. I like books and have woodworking books is nice.


14 May 2022

Joys of "Repurposing" a Tool

 I am not a minimalist tools worker.  I am not a tool collector.  I have excess tools for sure but I try and keep it under control.  When I started woodworking, my first hand plane I purchased was a Lie-Nielsen 4-1/2.  It's a good hand plane and I mostly used that for the first few years.  As I've grown in my woodworking, I have purchased more planes.  Generally speaking, I use a No 4 with a heavily cambered plane as a "scrub" to remove the bulk of the wood, then a No 5 jack to straighten, then a No 3 to do the final smoothing.  I like this three plane set up that I use.  On occasion, I use a No 8 or a formal scrub plane as needed.  The No 4-1/2 doesn't fit with what I normally do.  


For a while, I debated selling it.  When I ended up doing was purchasing a 55 degree frog for it.  As such, it was going to be my dedicated hand plane when I faced grain that was tearing out.  I am glad I didn't sell the plane and kept it for this purpose.  Rather recently, I am in the process of making a Krenov style cabinet that was feature in Popular Woodworking Feb 2022 issue.  The body and door is made of cherry.  In the door "panel" I am using a nice piece of figured maple for contrast.  My routine planes were all giving tear out on this figured maple.  I whipped out the high angle frog plane and the tear out was tamed.  I was quite happy by this.  I may not use my No 4-1/2 much anymore but when I do it often solves the problem.  Glad I kept it and repurposed it rather than selling it.   Now what to do with all the chisel sets I have .....

07 May 2022

My 10 year old did a mortise and tenon joint all by herself - proud papa

My wife and I try and encourage our 10 year old to do something other than sit in front of electronics.  With some strong nudging, she will get off the electronics and do art (wife is an artist) and woodwork (my big hobby).  At 10 I don't have a lot of expectations.  I just want her to find it "fun."  I know she has listened and in theory knows how do do things  This past weekend, she was in the shop woodworking.  I had already gone in the house.  I checked on her but didn't want to hover,  I wanted to let her explore.  She made "this."  When I asked I got two different answers over a few days.  The first was it was a hoe for the garden.  The second was it was a nail puller.


I am a proud papa.  She did it almost all by herself.  The only help she asked for was how to remove the wedge of wood as the coping saw was working well (more on that later).  At one point, I had checked in and she was working on a mortise and tenon.  Yup, my little daughter made her very one half inch deep mortise and tenon.  The real kicker, she was made it out of ash!  It's why the coping saw didn't work so well earlier.  Ash is incredibly hard wood.  When she had started I suggested different wood such as pine but she had made up her mind.  This "tool" is now handing proudly on my wall in the garage.